25 April 2006

Toon Tuesday #2: John Nevarez

I got these pictures from John Nevarez's blog. I study these daily because he captures so much in just a few lines. His line of action is very apparent in every single sketch. The body parts are all in rhythm with the action line making the poses fluid and beautiful. I also like in the second picture the example he has in the top right corner of a good silhouette. I know there are many times that I just want to draw a pictures and never think of the silhouette quality. I know I'm going to need to until it becomes habit if I ever want to be good! So, tips for the day. #1) Start your sketches off with an action line! Capture the mood or action of the character in one simple line. #2) Remember to think of your character's silhouette value. If you blacken in the character you should still know what they're doing. These will keep your pictures clean, discernable, and enjoyable!


Tuesday's Skull Study

I'm not going to worry myself with learning the names of the bones on the skull. When looking at the skull it's easy to see an egg and a circle shape in both views. In the front view, I dotted the bottom of the circle coming in just under the nose. If you divide the circle in half, you'll find the brows over the eyes. The widest part of the skull in the front view is just above the ears and in the side view it is widest at a point level with the top of the orbit (eye socket).


Masterpeice Monday #2: Gustave Caillebotte

Here is one of my favorite paintings ever and this is really the first time I'll try breaking it down artistically. The painting uses a central eye level creating a strong illusion that we are there on the same street with these people. You almost feel like you are there and will soon need to step out of the way of the couple approaching you. I think this is one reason I'm drawn into this picture so much. The eye level divides the picture horizontally while the lamp and it's reflection bisect it vertically. The intersection takes place at the central vanishing point creating four rectangles that each contribute a seperate element to the picture.

The lower right has strong shapes and contrasts establishing the foreground.
The lower left has a triangular arrangement between the people that echoes the shape of the building above it and establishes the middle ground.
The upper right links the foreground and background.
The upper left establishes the background.
So once again the composition has an extreme foreground, a middle ground, and a background.

I also enjoy the colors he used to express the mood. The greys and browns adding to the mood that is associated with rainy days. A wonderful wonderful painting indeed.

Monday's Neck Study

I didn't find too much out about the neck. Maybe I wasn't trying hard enough. I already saw that the neck was made up of seven vertabrae when I studied the spine. I did learn that the highest bone is called the atlas and is responsible for supporting the skull. The bone directly beneath it is called the axis and this rotates when you turn your head. You can hear it grind when you shake your head back and forth. They are shaped like a thick ring and have little hollows and knuckles that fit into each other allowing for flexible movement. Lastly, the 7th bone down from the top is much larger then the six above it. If you look at my drawing of the side view you'll see that the first six rest deep inside the neck but the seventh sticks out. Wow! Looks like I learned more then I gave myself credit!!


Saturday's Story

Here's a story that I came across and thought I'd share it instead of my sketches about a ceramics teacher and what he did one semester.

The ceramics teacher announced on opening day that he was dividing the class into two groups. All those on the left side of the studio, he said, would be graded solely on the quantity of work they produced, all those on the right solely on its quality. His procedure was simple: on the final day of class he would bring in his bathroom scales and weigh the work of the "quantity" group: fifty pound of pots rated an "A", forty pounds a "B", and so on. Those being graded on "quality", however, needed to produce only one pot -albeit a perfect one - to get an "A". Well, came grading time and a curious fact emerged: the works of highest quality were all produced by the group being graded for quantity. It seems that while the "quantity" group was busily churning out piles of work - and learning from their mistakes - the "quality" group had sat theorizing about perfection, and in the end had little more to show for their efforts than grandiose theories and a pile of dead clay.

The same principles apply to learning how to draw. I think too many of us sit and worry over making a perfect picture when the quality pictures won't come out until we find them through the process of "learning from our mistakes".

Saturday's Hand Study

Here's my bone study of the hand. The hand belongs to the radius bone of the lower arm. The wrist is the place where radius and ulna meet the upper bones of the carpus. There are eight bones in the carpus and the row next to the hand is wider. I read that the carpus serves as the shock absorbers for the hand. It makes sense too if you think about it. When you fall and try to break your fall, what is the part of the hand that gets beat up/scratched the most? I thought the shape of the carpus bones looked somewhat like the back of the rubber heel of dress shoes. The hand is usually thought of in two sections. The bottom section being the carpus and metacarpals (stationary) and the upper section the phalanges (moveable), both being equal in size. Just like the foot, the thumb only has one phalange while the other four fingers have two. The matecarpal in the hand start off in a boxlike shape at the carpus, then become a long rod, and then turn into a ball where the phalange meet the knuckles. The hand is just a little longer then one sternum length.

Friday's Fun Sketch

I am a contributing artist to Sketch-It and this was a request I had the chance to work on. I really enjoyed the subject of two homeless people chatting. I drew it with a Sharpie and dropped in some colors in PS. I had so much fun while working on it I really didn't want to finish the picture. I'm pleased with how it came...especially considering how fast I did it! I hope you enjoy it too!


Friday's Lower Arm Bones Study

I've been having problems with Blogger so let's hope this works and I can post everything I've done over the past few days. The lower arm has two bones named the ulna and the radius. They run parallel to each other when then hand is in a palm up position (supination). When the hand is palm down (pronation) the bones overlap each other as seen in the bottom picture. The ulna's function is simply flexion and extension. It bends and straightens the arm and that is all. The elbow belongs to the ulna while the radius holds the hand. The radius' function is to rotate the arm.

20 April 2006

Thousand Hand Thursday #1

Since last week's didn't count here is the start to my Thousand Hand Thursdays. I counted 37 hands and that was a lot for me. I wonder if I could pull off doing 100 in day? Anyway, it's going to take me quite a few Thursdays to get to a thousand so hopefully by the time I do I'll be pretty good at 'em. Without further ado, some hands (just so you know, I colored the ones I thought came out looking good). And on a side note, some of these were taken from references (i.e. how to books, cartoons, worksheets) and those that weren't look distorted or have broken fingers. Don't worry, these will improve with time too :)


Thursday's Upper Arm Study

Here's my study of the upper arm's bones. The upper arm only has the one bone but there's all those little treats in the shoulder keeping it in place and protecting it too. One thing that stuck to me in my study was that the socket that the head of the humerus sticks into points out, forward, and up a little so your shoulders are always pointing forward. The humerus is roughly two scapula or sternum lengths. That'd make it roughly the length of the ribs then, right? Well, hope you learned something and thanks for stopping by. Come again!


Wednesday's Perspective Scribbles

It was a busy day at work I these were the only scribbles I did in perspective. Just some Filipino payags. Not much but next week I'll do better...promise!


19 April 2006

Wednesday's Shoulder Girdle Study

I've been working really hard on drawing a picture for my brother so I only spent half an hour studying this early instead of the normal hour or so. As far as massing the whole girdle, I'll save that study for when I go more in depth on the muscles. For now I just studied the bones that are involved in the girdle. They are the clavicle in the front, the scapula in the back, the spine of the scapula, and the acromion process. These form a sheild and protect our humerus and the ball and socket joint. I have two triangles dotted in because the book I was reading out of was explaining how to build the this area of the body using two triangles. Enjoy!!

18 April 2006

Toon Tuesday #1: Ben Caldwell

Lately I've been studying the body, right? Well, I had an epiphany the other day while reading out of Ben Caldwell's books "Action! Cartooning" and "Fantasy! Cartooning". It wasn't anything I haven't read or seen before but it clicked. I actually feel kinda silly saying it, but like I said the other day somtimes stating the obvious helps us out. When Ben is constructing his characters he draws a line for the spine first. He then adds two circles. I always knew the circles were to help us know where to draw the torso and waist. What came to me as revelation from the art gods was that those circles were Ben's interpretations of what the rib cage and pelvis are. That shape is the simplified shape Ben has come to understand as the rib cage and pelvis. See? It sounds silly but it hit me like a ton of bricks. As I study the body, I too need to work with the different body parts and come to my own understanding of what they are and the best way to draw them for me. I added a few of his sketches for you to look and see if you understand what I'm talking about. I hope you do (otherwise I might sound like a fool..) :) These images are copyright of Ben Caldwell. For more of his art go to www.daredetectives.com or buy his books (mentioned earlier) at amazon.com or through his website.


Tuesday's Foot Study

Plug your noses everybody 'cause it's smelly down here! The foot, I learned, is easier looked at as two sections or systems. The ankle system and the heel system. The ankle system starts with the ankle and includes the navicular bone, and the three cunieform bones I numbered as 1,2, and 3. Then their respective metatarsal bones and phalanges. The heel system includes the heel bone, the cuboid, and the two remaining metatarsal bones and phalanges. The heel is built to support the weight of the whole body while the arc is our own shock absorber. The big toe only has two phalanges while all the others have three. I copied a sketch of Leondardo's study of the foot and on the pinky there's only two and I read that often the middle phalange and the end phalange merge making it look like there's only two. I ran out of time this morning studying the foot. There was so much to take in I'll have to study this again soon!

Sketches At The Hockey Rink

Last night my wife and I went to the Flames vs Ducks games. Front row seats baby! Man was it awesome! There was seriously like 20 fights! It's gonna be a good first round in the playoffs :)Anyway, we arrived early and I got a few sketches in. I never said they were good...Good news is I got a couple more bad drawings outta my system! The only one I thought was good was the guy in the hoodie. I thought I captured him well. My only question is how could someone look that sad on such a good night? Hmmm, professional violence.


17 April 2006

Masterpiece Monday #1: Chuck Jones

It's a shame that Chuck Jones' personal work isn't more well known than it is. I find his personal art work simply amazing! I chose one of his personal paintings as my first study. Here it is:


I like this picture for several reasons. My older brother has been pounding into me something simple for the last few months. A composition is interesting when you have a foreground, a middle-ground, and a background. It sounds simple but it's amazing how often it is overlooked or forgotten. I say my brother has been pounding it into my brain because I forget about it easily. Here, Mr. Jones used his focus as the foreground. He then has a few umbrellas and a man as his middle-ground, and the homes and fence as the background. These three layers create an interesting composition. I also like how he conveyed the feelings of form on the man and dog by using highlights and shadows. They're not complex. In fact, to me, they look almost block-like but it makes the picture believable because it tricks the eye into seeing form and volume. Lastly, I just really enjoy how there is still some cartoon influence in this work. I love how he can convey reality in such a convincing manner but when you look more closely you still see the animation influence. If there's anything else that caught your eye be sure to share with me! Thanks!!

Monday Lower Leg Bones Study

The lower leg bones fall into the category of function equalling form. The lower leg looks like it does because of it's function. First, the tibia is there to support the weight of the body above it and locks in nicely with the femur. The tibia changes shape from top to bottom from being a three-sided prism to a four-sided block at the ankle. The fibula bone starts lower than the tibia and ends lower too. The fibula doesn't carry any weight but is used for the origin and insertion of muscles. That's why the side of the leg with the fibula is more shapely. It has more muscles. The lower leg is the same height as the upper leg and the shape to the calf muscles are around 1/3 of the way down the lower leg.

Saturday's Treat

I didn't have time to sketch at all on Saturday. I spent the day painting my room with my wife. I never would have thought a room as small as ours would take so long to paint! Well, since I don't have any artwork to share I'll share some quotes by Robert Hale I found in my studies. They all have to do with understanding what's beneath the surface to improve our art. Enjoy!!

"First we draw what we see;
then we draw what we know;
finally we see what we know."

How true! When we all start to draw we copy exactly what we see, but as we understand more what we're drawing we don't copy. We create. I'm only on step two so I have yet to see what I know but I look forward to the day I do!

"Function makes form."

When we understand the purpose of a muscle, a tendon, or a bone we will understand why it looks like it does.

"You can't draw anything unless you know it exists."

Sometimes stating the obvious wakes us up and helps us get back to learning the basics.

15 April 2006

Friday's Doodles

During work today I was toying around with an idea my brother had. I was just having fun and trying to think of ways to draw some characters. We picture the idea in the style of Ben Caldwell and that's what I was trying to emulate. I wasn't pleased with most of these initial sketches and I didn't flesh them out except for the two towrads the bottom. The one with the sword was the only one I was semi pleased with. I might even fix it up and color it. We'll see. Enjoy and thanks for stopping by!


Friday Knee Study

The knee was fascinating as well. I learned a lot but the thing that stuck out most to me was the fatty pellet. This seems to be the thing that confuses most young artists because it varies so much in people that if you don't understand the anatomy underneath it you don't have much of a chance of figuring it out. It sits onderneath the patella and keeps the joints from causing sparks by rubbing together so much. Another thing that fascinated me was how the bones were designed so well as to be able to hold all of weight and still be used to help us move about. Well, I drew it from all four sides. Enjoy!!

14 April 2006

Thursday's Hand Studies

I spend an hour to an hour and a half each morning studying the human anatomy before going into work each morning. The rest of the day (work during the day and classes at night) is the time I have to draw the themes I set up for myself. So, when I have a busy day at work and a long night of homework I sometimes don't get as much drawing done as I would have liked. Like today, I only had time to draw 22 hands! 22! That's not very many. Oh well, here are the ones I did draw. Some I copied from handouts my older brother gave me, some are from Ben Caldwell's book Fantasy! Cartooning, others I did myself. Well, I can look forward to drawing more next week!

Thursday Upper Leg Study

The body is so fascinating. The more I study it the more fascinating it becomes. The good news is I just barely started so I have a lot more to be fascinated with!! My study of the upper leg was fun. The only bone in the upper leg is the femur and is about two heads tall from top to bottom. The pelvis has hole in it for the leg bone. To find it you construct an arc from the widest point of the pelvis to the bottom most point and it will be around the midway mark. The hole points down and to the outside. The head of the femur fits in the hole, connects with the neck of the bone, which in turn connects with the great tronchanter. Now, the great tronchater is a landmark for artists. It is the halfway point of the human body. Remembering the pelvis yesterday, it is on the same horizontal line as the top of the second triangle, or the pubic area. On the bottom of the femur is the patella which protects the knee joint.


13 April 2006

Wednesday's Heads

I didn't have themes for each day of the week until I decided to start this blog earlier today. So, yesterday I was drawing heads instead of working on perspective. The theme's for each day will start this next Monday. I had read some of Andrew Loomis' book "Drawing the Head and the Hands" prior to drawing these so a few of his principles were fresh in my mind. I was striving to think of them being cubed in so I could try and understand where the plane breaks were and how to shade them. There's a few that aren't too bad....right? :)


Wednesday Pelvis Study

The pelvis was fun to study this morning! From the bottom of the ribs, draw the same four sternum boxes. The top of the pelvis (the iliac bones) takes up the bottom half of the top boxes. Then, in the bottom two boxes, construct two triangles. The top triangle sets up the sacrum at the end of the spine and the bottom triangle sets up the pubic area. That's all I really remember from the study. I'll probably study it again in a week or two.


Tuesday Rib Cage Study

I went a little more in depth and studied the bones of the rib cage today. I learned that the spine has the "s" curve to it to support the different body parts attached to it. The top curve comes in under the head, then curves out to support the rib cage, the curves in again to support the pelvis. The number of vertabrae accordingly are 7, 12, and 5. The rib cage itself can be seen inside of four boxes. Each box being roughly the same side as your skull (minus the jaw). The sternum is half as tall as the rib cage. The clavicle on either side is the same length as each box (or the width of the ball of the head). There are twelve ribs but only ten connect to the sternum. There's a plane break in the rib cage in the front where the bone and cartilage meet. In the back, the plane break follows the curve of the scapula. The scapula too is as tall as one box and roughly half as wide. The cartilage at the bottom of the sternum is called the ensiform cartilage and if you draw a construction line horizontally across its end you'll find the wide point of the ribs cage. I'm not sure you can see everything. I need to learn to scan these pencils drawings in better...


Tuesday's Gestures

Just some more gestures. Nothing too special in this batch either.


Monday Rib Cage Study

I studied the mass of the rib cage this morning. I tried at first to block it in and then later tried visualizing it as a sphere or an egg like Vilppu teaches. I don't think this what Vilppu had in mind but gimme a year and I'll be better....promise:)


Monday Warm-Ups

I warmed up this morning with some gesture drawings. The only one I really like is the girl in the third one down twisting her body towards us.


Welcome!

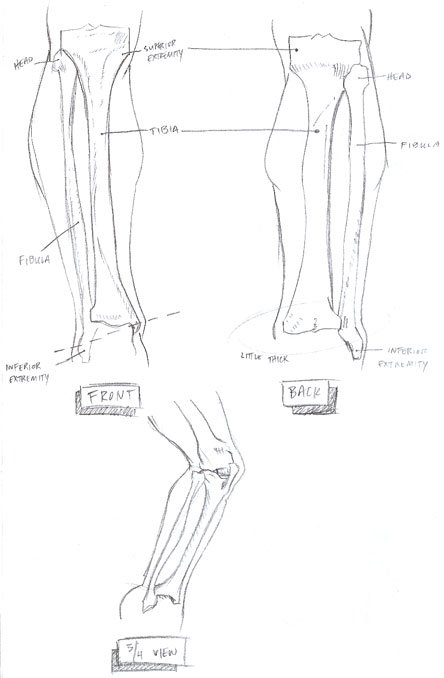
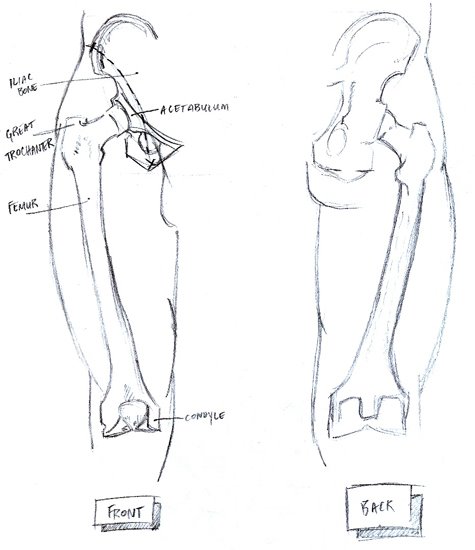
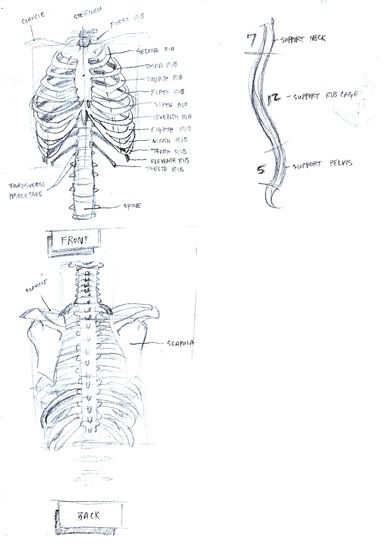
Welcome to my blog where every day I will post my sketches, doodles, inspirations, and drawings in an effort to become an artist. I have a tentative schedule where every morning I will start the day by studying human anatomy and then have the rest of the day to practice the day's theme. Each day of the week will have its owm theme (except Sunday where I'll be asleep most of the day) as follows:

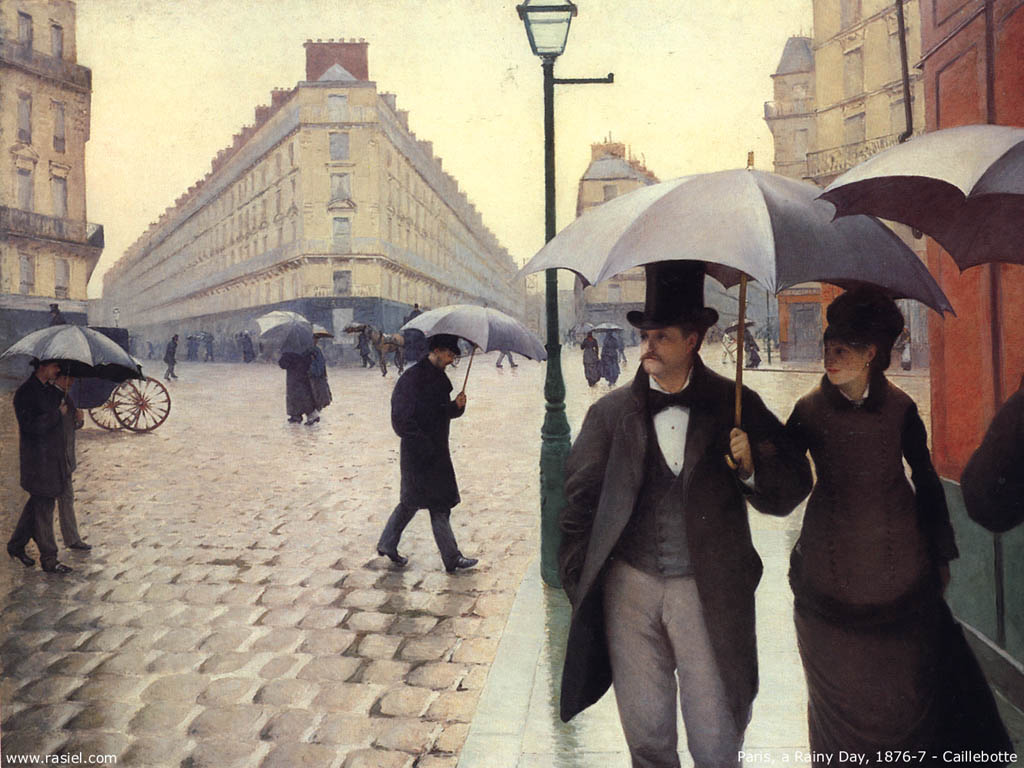
Masterpiece Monday: I'll study the works of great artists and try to understand what made their art so wonderful.
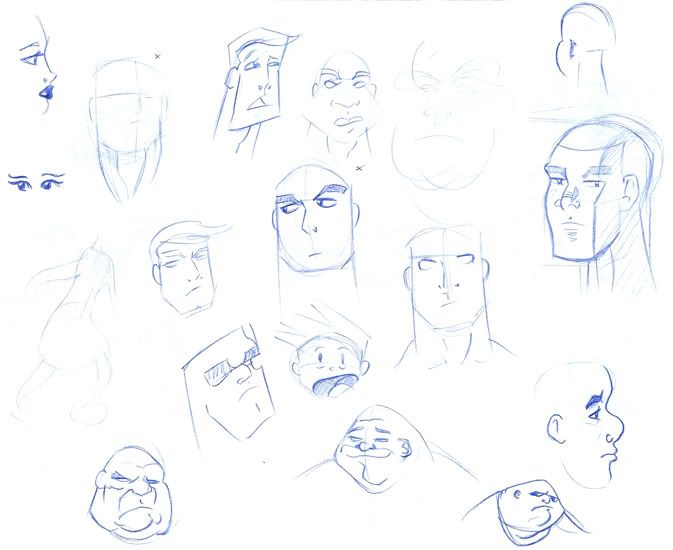
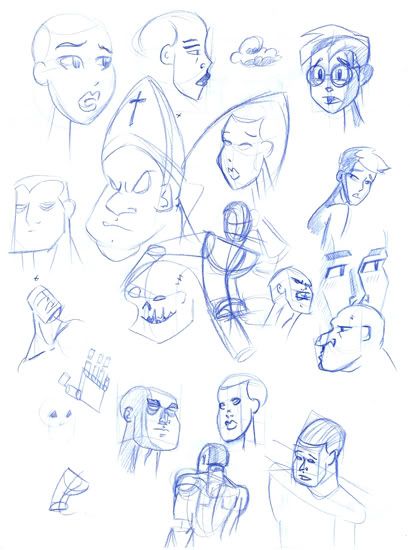
Toon Tuesday: A whole day dedicated to drawing and studying cartoons. In my opinion, the whole world would be a better place to live if everybody took an hour a day to watch Looney Tunes.
Perspective Wednesday: Where I'll practice drawing things in one, two, and three point perspective.
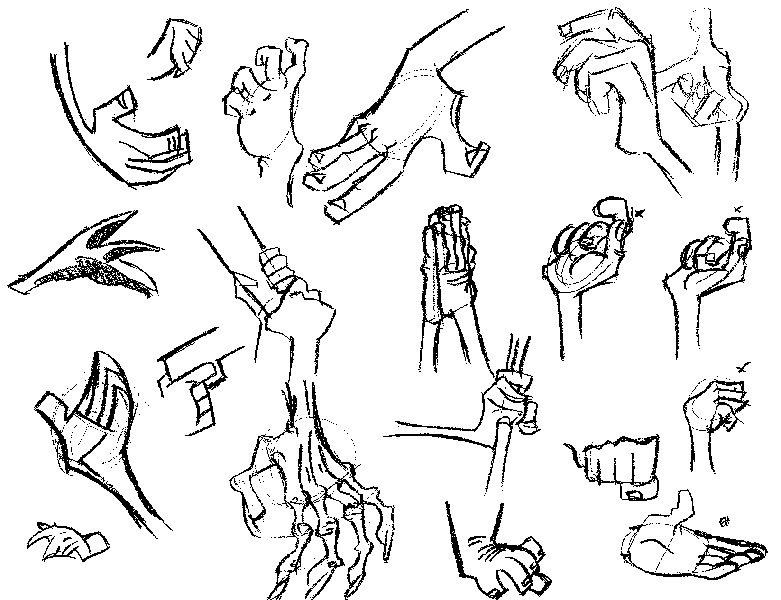
Thousand Hand Thursday: There's over 12 billion hands on the plant and even more ways to draw them.
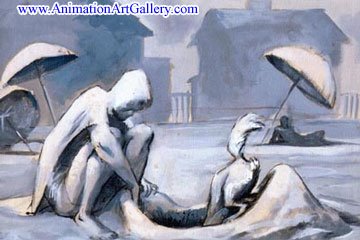
Fatuity Friday: A fun day set aside to draw all the foolish and crazy ideas floating around in my head.
Sketchcrawl Saturday: I'll spend the day drawing what I see while I'm out and about throughout the day.

I'm trying to improve and sometimes you need someone else to point out your mistakes so please don't be shy to comment. Thanks for stopping by! Enjoy!!